Overview
The layout is a Raspberry Pi using a DS18B20 digital temperature sensor that reads the temperature in the house. There is a NMT radio router in the house which serves Internet access. On a Tomcat server in the cloud, a Java web app accepts readings from the Raspberry via a REST API and stores the information in a CouchDB database. The web application also presents a single page web app that reads temperature data via the REST API and presents some nice graphs and tables. The frontend is built using Bootstrap to get a responsive design for both desktop and mobile.

The finished web application would look like this on desktop

and on a phone it would scale appropriately as well.
At the top the application will report for how long the sensor has been active (possibly since the last electricity outtake). If the sensor has not reported any readings during 15 minutes, it is assumed to be offline and a warning will be presented that we have no knowledge of the current temperature. If the ekectricity is gone in the house the heat will probably also be gone.
At the top the application will report for how long the sensor has been active (possibly since the last electricity outtake). If the sensor has not reported any readings during 15 minutes, it is assumed to be offline and a warning will be presented that we have no knowledge of the current temperature. If the ekectricity is gone in the house the heat will probably also be gone.
Setup the hardware
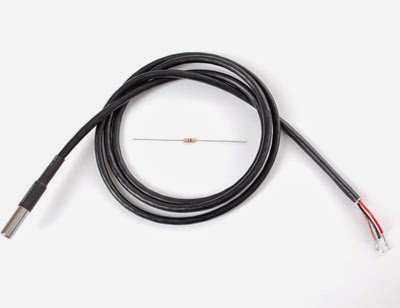
What you need:

So first of all let's setup the Raspberry Pi unit. I had the oldest model with 256MB RAM and Ethernet. I also have one of the newer 512MB models and I've tried the setup successfully on both. Since the 256MB version worked, that's the one I've shipped. Here's how to make it into a temperature sensor.
Try out the connections on a breadboard according to this sketch (borrowed from AdaFruit)
 The ports on the Pi are if not obvious in the sketch the 3.3V power port at slot 1, the data pin is pin #4 and the third wire is connected to ground.
There are several versions of the DS18B20 temperature sensor. I used the water proof version, it's only marginally more expensive than the others but since it has a chord in contrast to the other ones it can be put outside a window if you want.
Then install the software according to below and make sure everything works. However, to make the final product more stable and resistent to shakes you should of course solder the wires. I recommend using an experiment board for this with lanes. I bought one of these a long time ago from Swedish Kjell & Company. It makes the soldering easy and you have lanes of conducting copper which makes it easy to overview your structure and debug errors with a voltmeter.
 In this build the amount of board needed is tiny so not many cents of hardware needed. I bought a general purpose plastic box as well to mount the parts within. The box I found had predrilled holes within the box suitable for attaching PCBs and other parts. Very practical.
The final assembly looked like this with the top of the box removed

mkdir weatherstation
scp /WeatherStationServer/raspberrypi/src/weatherstation.py pi@piaddress:weatherstation/
#!/bin/sh
sleep 10
sudo python /home/pi/weatherstation/weatherstation.py
/home/pi/weatherstation/weatherstation.sh &
- Raspberry Pi
- SD card (at least 4GB)
- Micro USB cable
- Ethernet cable
- DS18B20 temperature sensor
- 4.7 kOhm resistor
- Wires
- Piece of PCB bread board
- Some kind of case
- Soldering iron

So first of all let's setup the Raspberry Pi unit. I had the oldest model with 256MB RAM and Ethernet. I also have one of the newer 512MB models and I've tried the setup successfully on both. Since the 256MB version worked, that's the one I've shipped. Here's how to make it into a temperature sensor.
Try out the connections on a breadboard according to this sketch (borrowed from AdaFruit)

 |
| DS18B20 water proof temp sensor |
There are several versions of the DS18B20 temperature sensor. I used the water proof version, it's only marginally more expensive than the others but since it has a chord in contrast to the other ones it can be put outside a window if you want.
Then install the software according to below and make sure everything works. However, to make the final product more stable and resistent to shakes you should of course solder the wires. I recommend using an experiment board for this with lanes. I bought one of these a long time ago from Swedish Kjell & Company. It makes the soldering easy and you have lanes of conducting copper which makes it easy to overview your structure and debug errors with a voltmeter.

The final assembly looked like this with the top of the box removed

Setup the software
- Burn Raspbian OS to SD card (I had an old 4GB digital camera SD card over.
- Enable SSHD as default. See http://macgyverdev.blogspot.se/2012/08/raspberry-pi-how-to-get-ssh-and-tomcat.html
- Create a script directory and copy the Python program into it. You find the python source code in the GitHub repository https://github.com/johannoren/WeatherStation in the folder raspberrypi/src/weatherstation.py
mkdir weatherstation
scp /WeatherStationServer/raspberrypi/src/weatherstation.py pi@piaddress:weatherstation/
- So the juice is in the weatherstation.py python script. But to run it by default on start up we create a wrapper bash script. Create a file /home/pi/weatherstation/weatherstation.sh containing
#!/bin/sh
sleep 10
sudo python /home/pi/weatherstation/weatherstation.py
- Make sure this kicks in when the Raspberry boots by adding this to /etc/rc.local
/home/pi/weatherstation/weatherstation.sh &
- In the weatherstation.py script, adjust the URI to your potential backend server. The lines containing the following should be adjusted to your server and appname. The appname should be changed to the name of your system preferrably so that you may have multiple systems running on the same backend and CouchDB database.
conn = httplib.HTTPConnection("192.168.1.6:8080")conn.request("POST", "/WeatherStationServer/api/temperature/appname", params, headers)
- Reboot the Raspberry Pi and the script should try to post readings to the URI in the script.
If you want to make your own script or just verify that the sensor is working correctly the important thing about this sensor is that when you add the kernel modules that handle the protocol the sensor is using, specific file handles will be created by the operating system containing the current temperature.
So you could alternatively try
sudo modprobe w1-gpio
sudo modprobe w1-therm
cd /sys/bus/w1/devices
ls
cd 28-xxxx (change this to match what serial number pops up)
cat w1_slave
So, assuming you are using the provided python script, now we must setup a server that can handle these temperature postings. The source code is in the GitHub repository, you can pull via https://github.com/johannoren/WeatherStation.git
Install this in a Java web server, I used Tomcat 7. To install Tomcat on a Linux Ubuntu flavoured server is trivial
sudo apt-get install tomcat7 tomcat7-admin tomcat7-common
I personally use Eclipse to build my code, and then export the Web module as war archive (Right-click on the module in Eclipse and choose Export -> WAR archive). Then you can deploy the war file directly in the Tomcat web admin console which is usually located here http://serveraddress/manager/html.
However, the application must store the temperature data in a database and it is configured to use HTTP RESTful calls to store and retrieve JSON data. CouchDB will make a perfect backend for this.
Some notes on installation and how to work with CouchDB using curl in this blog post http://macgyverdev.blogspot.se/2013/12/couchdb-on-linux-mint.html, but it is trivial, apt-get to install.
sudo apt-get install couchdb -y
Create a database for the particular temperature sensor application via
curl -vX PUT http://127.0.0.1:5984/nameofapp
Depending on where you have deployed the CouchDB databse the Java application must be adjusted to communicate to the correct address and port. Before building and exporting the war archive to deploy in Tomcat make sure this constant is correct
WeatherStation /src/se/noren/weatherstation/WeatherStationServiceImpl.java
private static final String COUCHDB_SERVER = "http://johanhtpc:5984";
That's it, now the web app on the server can start posting readings to the database via essentially doing POSTs to the same URL. I used Spring Templates in the Java code which makes REST calls a no brainer. Look at this source code to figure out how to wrap the Spring Template to handle cookies, error handling etcetera https://github.com/johannoren/WeatherStation/blob/master/src/se/noren/weatherstation/adapter/CouchDBAdapter.java
If you wish to see the contents of the database you can do something like this
curl -X GET http://127.0.0.1:5984/nameofapp/_all_docs?include_docs=true
And if you want to delete it to reset testing, you can guess what you need
curl -vX DELETE http://127.0.0.1:5984/nameofapp
All good. That's about it I think, if interested in more details on some part, please comment.
If you want to use Fahrenheit or some other system of measurement for temperatures, check out my new hobby project All About Units where there's a lot of goodies on units.
You can buy your Raspberry Pi from many places on the net. Amazon has got both new and used ones

Addition 2015-01-06:
This setup has been extended with another temperature sensor to monitor outside temperature as well. See this blogpost for the additions: http://macgyverdev.blogspot.se/2015/01/raspberry-pi-weather-station-with.html
Just for reference:
I added Google Analytics tracking to be able to see the utilization of the sensor. Here I learned a new thing as well about Analytics. I had the probe run for some time at home before christmas to see that it behaved stable and didn't crash after a long running time, which it didn't, but I unfortunately noticed that the first deployment I made in Google App Engine of the server backend used up to much resources and went over the free quota limit making the server unusable. So I moved the server backend to another server residing on a different domain. Suddenly the Analytics stats disappeared on december 22nd. I had already started wrapping the present. :-/

So the problem is that Google Analytics is specifying the cookie domain in the Javascript. I think this is new, I have no domains in my old Analytics scripts. So what you need to do if you encounter this problem is to manually change this line in the Google Analytics Javascript snippet
| (function(i,s,o,g,r,a,m){i['GoogleAnalyticsObject']=r;i[r]=i[r]||function(){ | |
| (i[r].q=i[r].q||[]).push(arguments)},i[r].l=1*new Date();a=s.createElement(o), | |
| m=s.getElementsByTagName(o)[0];a.async=1;a.src=g;m.parentNode.insertBefore(a,m) | |
| })(window,document,'script','//www.google-analytics.com/analytics.js','ga'); | |
| ga('create', 'UA-46361998-1', 'newdomain.com'); | |
| ga('send', 'pageview'); |
Hello, i successfully installed all what i need but when i import a war into tomcat app manager it say ok but clicking on the app it follow : HTTP 404 - /gardeneye/ description : La ressource demandée n''est pas disponible. I import git URI in eclipse and then export as zip archive...is that the good way to do ? Thank you (dkp0h at free dot fr)
ReplyDeleteHi, did you export as zip? A jar or war archive is in all essential the same as a zip archive but I still think you should export in Eclipse as a war archive since that will make sure your bin deployment folder is correclty assembled to a war archive. If you simply zip it it will contain source code and other unnecessary stuff.
DeleteOtherwise, check the Tomcat logs if there are any clues there?
Great project, and a¨m finally got it working :) The UI is different for that you have in your blog here. Mine is like this:
ReplyDeletehttps://dl.dropboxusercontent.com/u/9236068/10.jpg
Is it possible to share the UI you have?
BR
Hans Einar
Norway
Very nice UI! I've also been thinking of adding another sensor for outdoor temp. So to correlate outdoor temp with how well insulated the house is.
DeleteHere's a larger screenshot of my UI, http://www.acc.umu.se/~noren/tmp/sc-weather-station.png
Thnx, Johan
Hi. It looks realy good but I can't figure it out. Got in to the point where after running weatherstation.py I do get 200 - OK, web browser eg: 192.168.0.16:8080/webapp load website but no results are showing: (Fjärrsensor Temperaturmätning Holmön and circle spinning) thats it :(
ReplyDeletehttp://pastebin.com/Wafzd5hX - some print off
I would be glad if somebody give me a tips what to do next.
rywi
Nice one, i'll try this in future :)
ReplyDeleteHi, i am new to raspberry pi. I am trying to install 14 temp sensors( DS18B20). And I am receiving only 10 temp sensors out data. How can I assemble more sensors.
ReplyDeleteA HIPAA Privacy Officer is responsible for conducting privacy rule gap analysis and developing a HIPAA-compliant privacy program if one does not already exist, or – if a privacy program is already in place – for ensuring privacy policies & procedures to protect the integrity of PHI are enforced. A HIPAA Privacy Officer will have to monitor compliance with the privacy program, investigate incidents in which a breach of PHI may have occurred, report breaches as necessary, and ensure patients´ rights in accordance with state and federal laws.
ReplyDeleteHIPAA Security Officer Training
Hi, I find reading this article a joy. It is extremely helpful and interesting and very much looking forward to reading more of your work.. bathroom ventilation fan
ReplyDeleteAngila yurtdışı kargo
ReplyDeleteAndora yurtdışı kargo
Arnavutluk yurtdışı kargo
Arjantin yurtdışı kargo
Antigua ve Barbuda yurtdışı kargo
W4HK7
Bahreyn yurtdışı kargo
ReplyDeleteBangladeş yurtdışı kargo
Belarus yurtdışı kargo
Belize yurtdışı kargo
Benin yurtdışı kargo
WD5
salt likit
ReplyDeletesalt likit
dr mood likit
big boss likit
dl likit
dark likit
8LSM
Van
ReplyDeleteizmir
Artvin
Tunceli
Eskişehir
6P3
Ankara
ReplyDeleteAntalya
istanbul
Ordu
izmir
OD3Z7C
amasya
ReplyDeletesinop
çorum
sakarya
van
DK7AC
bitlis
ReplyDeletekastamonu
çorum
van
sakarya
0H0R1X
van
ReplyDeleteelazığ
zonguldak
uşak
sakarya
SCRU1
görüntülüshow
ReplyDeleteücretli show
YMSTUA
https://titandijital.com.tr/
ReplyDeletebayburt parça eşya taşıma
afyon parça eşya taşıma
düzce parça eşya taşıma
erzincan parça eşya taşıma
5LUA
Kırşehir Lojistik
ReplyDeleteHakkari Lojistik
Kars Lojistik
Konya Lojistik
Kilis Lojistik
VFHGT
102F2
ReplyDeleteÇorlu Lojistik
Urfa Lojistik
Giresun Evden Eve Nakliyat
Kastamonu Lojistik
Aksaray Evden Eve Nakliyat
7576F
ReplyDeleteSakarya Parça Eşya Taşıma
Yalova Parça Eşya Taşıma
Uşak Evden Eve Nakliyat
Iğdır Lojistik
Tokat Evden Eve Nakliyat
2CEBD
ReplyDeleteorder clenbuterol
halotestin
Zonguldak Evden Eve Nakliyat
buy testosterone propionat
order steroids
Tekirdağ Cam Balkon
Afyon Evden Eve Nakliyat
buy winstrol stanozolol
Kırklareli Evden Eve Nakliyat
0F4EC
ReplyDeleteBolu Parça Eşya Taşıma
Nevşehir Şehir İçi Nakliyat
Kars Evden Eve Nakliyat
Çerkezköy Oto Lastik
Bolu Şehirler Arası Nakliyat
Karaman Şehir İçi Nakliyat
Edirne Evden Eve Nakliyat
Kütahya Parça Eşya Taşıma
Ardahan Lojistik
D0F38
ReplyDeleteBursa Parça Eşya Taşıma
Nexa Coin Hangi Borsada
Yalova Lojistik
Düzce Evden Eve Nakliyat
Uşak Şehirler Arası Nakliyat
Btcst Coin Hangi Borsada
Gate io Güvenilir mi
Huobi Güvenilir mi
Telcoin Coin Hangi Borsada
1331C
ReplyDeleteYozgat Şehir İçi Nakliyat
Zonguldak Şehir İçi Nakliyat
Kilis Parça Eşya Taşıma
Sinop Lojistik
Çerkezköy Kurtarıcı
Altındağ Boya Ustası
Osmaniye Şehirler Arası Nakliyat
Dxgm Coin Hangi Borsada
Çorum Lojistik
FD346
ReplyDeleteÇanakkale Evden Eve Nakliyat
Yalova Evden Eve Nakliyat
Ünye Kurtarıcı
Ankara Evden Eve Nakliyat
Ankara Parça Eşya Taşıma
Bursa Parça Eşya Taşıma
Keçiören Parke Ustası
Bolu Şehir İçi Nakliyat
Çerkezköy Çamaşır Makinesi Tamircisi
3ECA8
ReplyDeletesteroid cycles
Eryaman Alkollü Mekanlar
order turinabol
Çankırı Evden Eve Nakliyat
Iğdır Evden Eve Nakliyat
Bartın Evden Eve Nakliyat
Hatay Evden Eve Nakliyat
order halotestin
Zonguldak Evden Eve Nakliyat
ACF96
ReplyDeleteBitcoin Kazanma Siteleri
Binance Hesap Açma
Bitcoin Yatırımı Nasıl Yapılır
Bitcoin Nasıl Üretilir
Bitcoin Madenciliği Nasıl Yapılır
Bitcoin Nasıl Kazılır
Kripto Para Kazanma Siteleri
Coin Nasıl Çıkarılır
Coin Kazma
E1D7D
ReplyDeletekilis en iyi ücretsiz sohbet uygulamaları
antep parasız görüntülü sohbet
Karabük Sohbet Muhabbet
bedava sohbet siteleri
Konya Parasız Görüntülü Sohbet Uygulamaları
Çanakkale Muhabbet Sohbet
urfa telefonda kızlarla sohbet
Rize Mobil Sohbet Et
çorum mobil sesli sohbet
49D45
ReplyDeletePeriscope Beğeni Satın Al
Okex Borsası Güvenilir mi
Bitcoin Mining Nasıl Yapılır
Bitcoin Oynama
Parasız Görüntülü Sohbet
Binance Borsası Güvenilir mi
Kripto Para Kazanma
Bitcoin Nasıl Alınır
Luffy Coin Hangi Borsada
961FF9C8B9
ReplyDeletetelegram ücretli şov
شركة تسليك مجاري في أبوظبي d3NImCUcap
ReplyDelete63253ED591
ReplyDeletetürk takipçi satın al
5C639B7D41
ReplyDeletedüşmeyen takipçi
0BF1A451DB
ReplyDeleteinstagram garantili takipçi
1AC38E964A
ReplyDeletetiktok takipçi
organik takipçi
türk takipçi satın al
Yazının İcadı İnsanların Yaşamına Hangi Alanlarda Katkı Sağlamıştır?
Kazandırio Kodları
Sıra Bulucu
Bitcoin En Güvenilir Nereden Alınır
Herle Nedir
Love With Flaws Konusu
940055ECE5
ReplyDeleteinstagram organik türk takipçi
twitter beğeni satın al
düşmeyen takipçi
instagram takipçi
organik takipçi
81B3B26F00
ReplyDeletetiktok bot takipçi
tiktok beğeni satın al
takipçi
düşmeyen takipçi
fake takipçi