Showing posts with label tomcat. Show all posts

Tuesday, 11 February 2014

Apache web server as reverse proxy and virtual host for Tomcat 7

I'm running a couple of sites on a Linux server on my local network. I only have one public ip address but I want to be able to host multiple sites on my servers. So this can be done by using a reverse proxy in front of the application servers which delegates traffic depending on which host name the end user was trying to request.

I've implemented this by using the reverse proxy feature with virtual hosts in the Apache HTTP web server.
The result this exercise is trying to achieve is that external traffic from internet requesting pages from the site www.all-about-units.com which is DNS mapped to my public ip address will be routed to the Apache web server on the local network via a port forwarding rule in the router on the local network. The Apache web server will look into its rules for virtual hosts and see that the user requested the domain www.all-about-units.com and therefore delegate the traffic to a separate Apache Tomcat 7 servlet container running on the local network to serve the request. The traffic is then forwarded back through the web server to the end user.

Setup Apache HTTP server as reverse proxy

First of all the Apache HTTP web server must be installed. I had mine installed since long ago but if I remember correctly there's not much than doing this is you have a Debian/Ubuntu/Mint like Linux server

sudo apt-get install apache2

Now, to enable the reverse proxy feature of the Apache server

/ $ sudo a2enmod proxy_http

Next, we must create a configuration for our new site as a virtual host. Go to the directory of available sites

/etc/apache2/conf.d $ cd /etc/apache2/sites-available/

Copy the default configuration to a setup for your site

/etc/apache2/sites-available $ sudo cp default all-about-units

Lets edit the configuration file. The first line tells the Apache server to listen on port 80, the standard HTTP port. Next the names of the virtual host are given. So traffic requesting another domain name or the ip address directly will not be handled by this virtual host configuration.

Next look att the ProxyPass and ProxyPassReverse, these tell Apache where to forward the request that has matched this virtual host rule. In this case to the Tomcat server on the same machine (127.0.0.1 is the loopback address of localhost) but on port 8080. The slash before the address means that all requests should be forwarded to the  Tomcat server. If for example you had ProxyPass /foo/bar/ http://127.0.0.1:8080/ then the request www.all-about-units.com/foo/bar/page.html would be redirected to 127.0.0.1:8080/page.html

/etc/apache2/sites-available $ sudo vim all-about-units
<VirtualHost *:80>
  ServerName all-about-units.com
  ServerAlias www.all-about-units.com
  ProxyRequests Off
  ProxyPreserveHost On
  <Proxy *>
    Order deny,allow
    Allow from all
  </Proxy>
  ProxyPass / http://127.0.0.1:8080/
  ProxyPassReverse / http://127.0.0.1:8080/
</VirtualHost>

Enable and disable the site

To tell the Apache HTTP web server to enable this configuration, run the a2ensite command on the name of the new configuration

/etc/apache2/sites-available $ sudo a2ensite all-about-units
Enabling site all-about-units.
To activate the new configuration, you need to run:
  service apache2 reload

Reload Apache

/etc/apache2/sites-available $ sudo service apache2 reload
 * Reloading web server config      

I had some issues so I restarted Apache the hard way also and then it works.

/etc/apache2/sites-available $  sudo /etc/init.d/apache2 restart
 * Restarting web server apache2                                                          apache2: Could not reliably determine the server's fully qualified domain name, using 127.0.1.1 for ServerName
 ... waiting apache2: Could not reliably determine the server's fully qualified domain name, using 127.0.1.1 for ServerName

That's it!

Verify in the logs of the application server that the request are directed correct and your home.
Next step might be to enable the mod cache feature of Apache to let the web server handle caching of all static material served by the application server like css, images and javascript. More on that in another post.

If you for some reason want to take the site of the web for some time you can instead of stopping the application server disable the site in the web server virtual host forwarding by using the command

sudo a2dissite all-about-units

Tuesday, 4 February 2014

How to make Jenkins install the packaged war in a Tomcat 7

This is a sequel to http://macgyverdev.blogspot.se/2014/01/setup-jenkins-project-from-git.html where I set up Jenkins to build my latest project. The next step is to install the war-file built by Jenkins on my Tomcat 7 server.

First of all we must make sure Tomcat accepts installations by scripting instead of the human html GUI version. In the tomcat-users.xml file, located in something similar to this:

/var/lib/tomcat7/conf/tomcat-users.xml

Make sure that the admin user, whatever his name is, has the role manager-script. Here's the important part of my file:

<tomcat-users>

<role rolename="manager-gui"/>
<role rolename="manager-script"/>
<role rolename="manager"/>
<role rolename="admin-gui"/>
<role rolename="admin-script"/>
<role rolename="admin"/>

<user username="admin" password="somethignsecret" roles="manager-gui,admin-gui,manager,admin,manager-script,admin-script"/>

</tomcat-users>

Now, in Jenkins you must install the Deploy Plugin. You find it in the plugins section.


Your Jenkins job is here assumed to be configured to package a war file. You can verify this by inspecting that a build generates a war file like this:

~/.jenkins/jobs/UnitConversion/workspace/target/Unitconversion.war

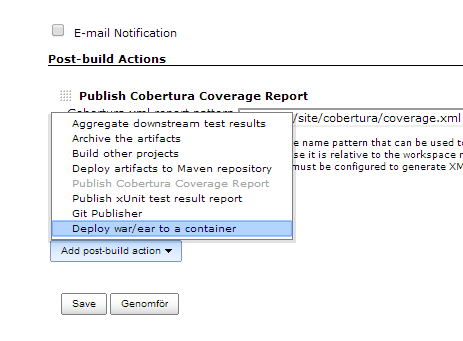
For this Jenkins job, go to the settings page and add a new post-build action. Choose the "Deploy war/ear to a container".

In this view make sure the path to the packaged war is relative to the workspace area of the job. Most probably it will be "target/yourapp.war".


Now, rebuild your job and when inspecting the console logs you should see that the war/ear is installed!

Deploying /home/johan/.jenkins/jobs/UnitConversion/workspace/target/Unitconversion.war to container Tomcat 7.x Remote
  Redeploying [/home/johan/.jenkins/jobs/UnitConversion/workspace/target/Unitconversion.war]
  Undeploying [/home/johan/.jenkins/jobs/UnitConversion/workspace/target/Unitconversion.war]
  Deploying [/home/johan/.jenkins/jobs/UnitConversion/workspace/target/Unitconversion.war]
Finished: SUCCESS

This way it takes two clicks from editing the code in Eclipse to update the site All About Units in production, first commit and push to Git, second start the Jenkins job.

One note, if you have deployed your application with context root "/" in Tomcat as I have done, see http://macgyverdev.blogspot.se/2014/02/how-to-change-context-root-to-in-tomcat.html, you can not have Context path = "/" in the configuration above. Instead, keep multiple context roots in Tomcat, and as in my example add the context root with a longer name, otherwise the deploy plugin cannot undeploy the ROOT web application. If you according to my blog post on it has manipulated the server.xml a reinstallation of "/webappname" will also reinstall the ROOT application since they point to the same directory on disk.

How to change context root to / in Tomcat 7

Here's my problem, I have a new project going which will be deployed as http://www.all-about-units.com/en. It's a site for general facts and info about units. It's a Java web application running on a Tomcat 7 servlet container. It is automatically deployed to the context root "Unitconversion" since that is the name of the WAR-file when it is uploaded via the admin ui.
That means I will access it as

http://myserver:port/Unitconversion

I want it to be deployed as context root "/" so that the URL becomes this in production

http://myserver:port/

My Tomcat 7 is running on a Linux Mint server but I guess these instructions are the same regardless of operating system. Here's how I managed to get it working.

First I uploaded my new web application in the Tomcat manager admin GUI. We got something like this now.


Now, if you inspect the file system you should have your app deployed at  /var/lib/tomcat7/webapps.

johan@johanhtpc /var/lib/tomcat7/webapps $ ll
total 31040
drwxrwxr-x  5 tomcat7 tomcat7     4096 feb  4 20:22 .
drwxr-xr-x  6 root    root        4096 dec 18 19:25 ..
drwxr-xr-x  3 root    root        4096 dec 18 19:25 ROOT
drwxr-xr-x 10 tomcat7 tomcat7     4096 feb  4 20:22 Unitconversion
-rw-r--r--  1 tomcat7 tomcat7 23617897 feb  4 20:22 Unitconversion.war
drwxr-xr-x  8 tomcat7 tomcat7     4096 dec 28 12:44 WeatherStationServer
-rw-r--r--  1 tomcat7 tomcat7  8140647 dec 28 12:44 WeatherStationServer.war

The hacky way now would be to change the ROOT application with my new code, a simple overwrite with my web app. But that doesn't smell so good...

So what you do is that you edit

/var/lib/tomcat7/conf/server.xml

and add these lines inside the <Host> element. Change "Unitconversion" to your application name.

<Context path="" docBase="Unitconversion">
   <!-- Default set of monitored resources -->
   <WatchedResource>WEB-INF/web.xml</WatchedResource>
</Context>
<Context path="ROOT" docBase="ROOT">
   <!-- Default set of monitored resources -->
   <WatchedResource>WEB-INF/web.xml</WatchedResource>
</Context>

This will make the default root application appear under context root "/ROOT".
Restart Tomcat to make changes take place.

sudo /etc/init.d/tomcat7 restart

And now the app is accessible at "/" and at the old context root "Unitconversion" as well. This is also seen in the GUI if you refresh the manager.


Wednesday, 1 January 2014

Weather Station using Raspberry Pi, Tomcat and CouchDB

As a Christmas gift I've built a remote temperature sensoring system to make it possible to record and keep track of the temperature in a summer house on an island in the Baltic Sea. The background is that the temperature cannot be too cold in the house during the winter, since the piping may freeze. This gizmo could maybe help in tuning the electric heating of the house to avoid making it too warm but not too cold either. It will also help to identify when the power is out in the house and the heating is malfunctioning making it necessary to travel out to the house to avoid the water to freeze.

Overview

The layout is a Raspberry Pi using a DS18B20 digital temperature sensor that reads the temperature in the house. There is a NMT radio router in the house which serves Internet access. On a Tomcat server in the cloud, a Java web app accepts readings from the Raspberry via a REST API and stores the information in a CouchDB database. The web application also presents a single page web app that reads temperature data via the REST API and presents some nice graphs and tables. The frontend is built using Bootstrap to get a responsive design for both desktop and mobile.


The finished web application would look like this on desktop


and on a phone it would scale appropriately as well.

At the top the application will report for how long the sensor has been active (possibly since the last electricity outtake). If the sensor has not reported any readings during 15 minutes, it is assumed to be offline and a warning will be presented that we have no knowledge of the current temperature. If the ekectricity is gone in the house the heat will probably also be gone.

Setup the hardware

What you need:

  • Raspberry Pi
  • SD card (at least 4GB)
  • Micro USB cable
  • Ethernet cable
  • DS18B20 temperature sensor
  • 4.7 kOhm resistor
  • Wires
  • Piece of PCB bread board
  • Some kind of case
  • Soldering iron

So first of all let's setup the Raspberry Pi unit. I had the oldest model with 256MB RAM and Ethernet. I also have one of the newer 512MB  models and I've tried the setup successfully on both. Since the 256MB version worked, that's the one I've shipped. Here's how to make it into a temperature sensor.

Try out the connections on a breadboard according to this sketch (borrowed from AdaFruit)

The ports on the Pi are if not obvious in the sketch the 3.3V power port at slot 1, the data pin is pin #4 and the third wire is connected to ground.
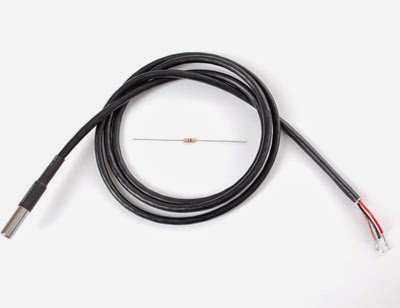
DS18B20 water proof temp sensor

There are several versions of the DS18B20 temperature sensor. I used the water proof version, it's only marginally more expensive than the others but since it has a chord in contrast to the other ones it can be put outside a window if you want.

Then install the software according to below and make sure everything works. However, to make the final product more stable and resistent to shakes you should of course solder the wires. I recommend using an experiment board for this with lanes. I bought one of these a long time ago from Swedish Kjell & Company. It makes the soldering easy and you have lanes of conducting copper which makes it easy to overview your structure and debug errors with a voltmeter.

In this build the amount of board needed is tiny so not many cents of hardware needed. I bought a general purpose plastic box as well to mount the parts within. The box I found had predrilled holes within the box suitable for attaching PCBs and other parts. Very practical.


The final assembly looked like this with the top of the box removed


Setup the software


mkdir weatherstation
scp /WeatherStationServer/raspberrypi/src/weatherstation.py      pi@piaddress:weatherstation/
  • So the juice is in the weatherstation.py python script. But to run it by default on start up we create a wrapper bash script. Create a file /home/pi/weatherstation/weatherstation.sh containing

 #!/bin/sh
sleep 10
sudo python /home/pi/weatherstation/weatherstation.py

  • Make sure this kicks in when the Raspberry boots by adding this to /etc/rc.local

/home/pi/weatherstation/weatherstation.sh &

  • In the weatherstation.py script, adjust the URI to your potential backend server. The lines containing the following should be adjusted to your server and appname. The appname should be changed to the name of your system preferrably so that you may have multiple systems running on the same backend and CouchDB database.
conn = httplib.HTTPConnection("192.168.1.6:8080")
conn.request("POST", "/WeatherStationServer/api/temperature/appname", params, headers)
  • Reboot the Raspberry Pi and the script should try to post readings to the URI in the script.
If you want to make your own script or just verify that the sensor is working correctly the important thing about this sensor is that when you add the kernel modules that handle the protocol the sensor is using, specific file handles will be created by the operating system containing the current temperature.
So you could alternatively try

sudo modprobe w1-gpio
sudo modprobe w1-therm
cd /sys/bus/w1/devices
ls
cd 28-xxxx (change this to match what serial number pops up)
cat w1_slave

So, assuming you are using the provided python script, now we must setup a server that can handle these temperature postings. The source code is in the GitHub repository, you can pull via https://github.com/johannoren/WeatherStation.git

Install this in a Java web server, I used Tomcat 7. To install Tomcat on a Linux Ubuntu flavoured server is trivial 

sudo apt-get install tomcat7 tomcat7-admin tomcat7-common

I personally use Eclipse to build my code, and then export the Web module as war archive (Right-click on the module in Eclipse and choose Export -> WAR archive). Then you can deploy the war file directly in the Tomcat web admin console which is usually located here http://serveraddress/manager/html.

However, the application must store the temperature data in a database and it is configured to use HTTP RESTful calls to store and retrieve JSON data. CouchDB will make a perfect backend for this.

Some notes on installation and how to work with CouchDB using curl in this blog post http://macgyverdev.blogspot.se/2013/12/couchdb-on-linux-mint.html, but it is trivial, apt-get to install.

sudo apt-get install couchdb -y

Create a database for the particular temperature sensor application via

curl -vX PUT http://127.0.0.1:5984/nameofapp

Depending on where you have deployed the CouchDB databse the Java application must be adjusted to communicate to the correct address and port. Before building and exporting the war archive to deploy in Tomcat make sure this constant is correct

WeatherStation /src/se/noren/weatherstation/WeatherStationServiceImpl.java

private static final String COUCHDB_SERVER = "http://johanhtpc:5984";

That's it, now the web app on the server can start posting readings to the database via essentially doing POSTs to the same URL. I used Spring Templates in the Java code which makes REST calls a no brainer. Look at this source code to figure out how to wrap the Spring Template to handle cookies, error handling etcetera https://github.com/johannoren/WeatherStation/blob/master/src/se/noren/weatherstation/adapter/CouchDBAdapter.java

If you wish to see the contents of the database you can do something like this

curl -X GET http://127.0.0.1:5984/nameofapp/_all_docs?include_docs=true

And if you want to delete it to reset testing, you can guess what you need

curl -vX DELETE http://127.0.0.1:5984/nameofapp

More commands in the previous mentioned post.

All good. That's about it I think, if interested in more details on some part, please comment.

If you want to use Fahrenheit or some other system of measurement for temperatures, check out my new hobby project All About Units where there's a lot of goodies on units.

You can buy your Raspberry Pi from many places on the net. Amazon has got both new and used ones for a cheaper prize.


Addition 2015-01-06:
This setup has been extended with another temperature sensor to monitor outside temperature as well. See this blogpost for the additions: http://macgyverdev.blogspot.se/2015/01/raspberry-pi-weather-station-with.html


Just for reference:
I added Google Analytics tracking to be able to see the utilization of the sensor. Here I learned a new thing as well about Analytics. I had the probe run for some time at home before christmas to see that it behaved stable and didn't crash after a long running time, which it didn't, but I unfortunately noticed that the first deployment I made in Google App Engine of the server backend used up to much resources and went over the free quota limit making the server unusable. So I moved the server backend to another server residing on a different domain. Suddenly the Analytics stats disappeared on december 22nd. I had already started wrapping the present. :-/


So the problem is that Google Analytics is specifying the cookie domain in the Javascript. I think this is new, I have no domains in my old Analytics scripts. So what you need to do if you encounter this problem is to manually change this line in the Google Analytics Javascript snippet

(function(i,s,o,g,r,a,m){i['GoogleAnalyticsObject']=r;i[r]=i[r]||function(){
(i[r].q=i[r].q||[]).push(arguments)},i[r].l=1*new Date();a=s.createElement(o),
m=s.getElementsByTagName(o)[0];a.async=1;a.src=g;m.parentNode.insertBefore(a,m)
})(window,document,'script','//www.google-analytics.com/analytics.js','ga');
ga('create', 'UA-46361998-1', 'newdomain.com');
ga('send', 'pageview');

Saturday, 4 August 2012

Raspberry Pi - how to get ssh and Tomcat running

Finally got my Raspberry Pi! The cheap $25/$35 board with 700Mhz ARM cpu, GPU, 256 mb RAM, dual USB, ethernet and a bunch of general purpose IO pins. Looking awesome in its bare metal and firing it up is no problem. I flashed an SD card with the Raspbian “wheezy” Linux distribution. To write the image to the SD card I used Win32DiskImager from a PC with SD card slot.

After attaching USB keyboard, network cable and HDMI  it comes to life by using a micro USB as power supply. The diods flashes and even X runs quite smooth on this limited hardware.

However, after playing around I soon realised I will be much more comfortable working on a distance from my ordinary desktop machine. So how to enable ssh?
A lot of tutorials talks about something as simple as this to enable ssh daemon on boot.
sudo mv /boot/boot_enable_ssh.rc /boot/boot.rc

Sorry, I have no such files in my /boot directory. Furthermore, when trying to start the ssh daemon with
/etc/init.d/ssh start
it refuses to start. Clues in the startup log are

Could not load host key: /etc/ssh/ssh_host_rsa_key Could not load host key: /etc/ssh/ssh_host_dsa_key

Why these are corrupt I don't know, but it's easy to regenerate them.

ssh-keygen -t rsa1 -f /etc/ssh/ssh_host_rsa_key
ssh-keygen -t dsa -f /etc/ssh/ssh_host_dsa_key

Make ssh daemon start permanent

sudo update-rc.d ssh defaults

sudo reboot and everything seems ok.

Now, my mission for tonight was to get a web server running on the chipset. Here's what you need to do to make Tomcat 7 run.

Tomcat obviously need Java:
sudo apt-get install openjdk-6-jdk

And you obviously need a potent editor
sudo apt-get install vim

Clean up your installs to save some space on the SD card
sudo apt-get clean

Now, download, unpack and install Tomcat
wget http://mirrors.axint.net/apache/tomcat/tomcat-7/v7.0.28/bin/apache-tomcat-7.0.28.tar.gz
tar xzf apache-tomcat-7.0.28.tar.gz
cd apache-tomcat-7.0.28/conf
vim tomcat-users.xml

Add a user to the authorization file, directly below <tomcat-users> add
<user username="system" password="raspberry" roles="manager-gui"/>

Now start Tomcat
cd ../bin
sudo sh startup.sh

Nice! From your PC (or via a browser on the Pi) surf against the Tomcat console.
http://192.168.1.90:8080/

(Figure out the ip address via for example ifconfig)

It takes a short while to warm up the server but then you can login via Manager App. Now, it's business as usual. Upload a war archive and you have a nifty web server running you web application, for $35!