Showing posts with label git. Show all posts

Monday, 17 March 2014

New Eclipse project connected to Git repository

You have a new Eclipse project to work on and you want to version control it on a Git repository on another machine. Here's how you do it.

1. On the server you wish to have your Git repository remotely stored, setup an empty repository. In our examples here the repository and project will be called UVaOnline

johan@htpc ~/gitrepos $ pwd
/home/johan/gitrepos
johan@htpc ~/gitrepos $ mkdir UVaOnline.git
johan@htpc ~/gitrepos $ cd UVaOnline.git/
johan@htpc ~/gitrepos/UVaOnline.git $ git --bare init --shared=all

2. Add a file to this empty project if you wish to make sure there is something to check out from Eclipse.

johan@htpc ~/gitrepos $ cd /tmp
johan@htpc /tmp $ git clone /home/johan/gitrepos/UVaOnline.git/
johan@htpc /tmp $ cd UVaOnline/
johan@htpc /tmp $ touch FOO
johan@htpc /tmp $ git add FOO
johan@htpc /tmp $ git commit
johan@htpc /tmp $ git push origin master


3. In Eclipse, add the Git Repository Exploring perspective via the menu Window -> Open Perspective.


4. Click the "Clone a Git repository and add the clone to this view" icon in the perspective.

5. In the first step of this wizard, enter the connection details for the Git repository. In my case I use my SSH user to log on the server.


6. If your project was emtpy, you only have the master branch to work with. Click next.


7. Choose where you wish to have your local Git repository on the machine Eclipse is installed on. I selected the "Import all existing projects after clone finishes".


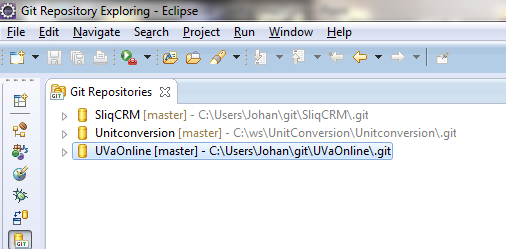
8. Now a new repository should be available in the Git repository Explorer.


9. Try to fetch the repository if you want to see the refs configurred.


10. You see the connection URL again, next.


11. Here you could add or delete refs pointers. For our purposes, this looks alright.


12. To import the project into the Java/Java EE perspectives, click the "Import Projects" option in the menu.


13. Since this project is a bare bones project with no .project file with Java facets, we must select to import the project as a "Import as general project".


14. Probably the default name is good enough.


15. Now you could start adding file to your project. I made my project a Maven project here and added some source code. Once you're ready to commit to the remote repository, right-click and choose Team -> Synchronise Workspace.


16. In the next view, select the files you wish to commit and add them to Git index first.


17. Then right click again and commit.


18. If you do not click "Commit and push" the files are only added to your local git repository on the same machine. That can be good if you want to pile up a bunch of local commits before pushing to the remote repository. When you want to push all local commits, in the Java perspective right click and go via Remote to Push.


19. If it is the first time, you might need to add a spec for this. If you work on master which you do if you have followed the tutorial, simple add "refs/heads/master" as source and destination ref and click "Add spec".


20. New spec added.


21. Once finished, the commits you had locally are pushed to the remote repo.


Thats it. I have some more stuff on working with Git in Eclipse in this blogpost about Github cloning

For more advanced Git usage, you might need the console. That's no problem, simply make sure to refresh the Eclipse project after working in the console since Eclipse must refresh the .git folder etcetera. See this Git cheat sheat for my favourites.

Friday, 24 January 2014

Setup Jenkins project from Git repository with Findbugs, Cobertura and Checkstyle

I created a Jenkins setup for my current Java hobby project (a site on physical units intended to make ads money, check it out at http://www.all-about-units.com) yesterday and noticed that my old note on how to setup Jenkins (then it was written for Hudson) is a bit out of date. The Jenkins configuration menues for generating Findbugs static analysis, Cobertura code coverage and Checkstyle format control were completely new. In addition to that, I've migrated to Git since then so there are a few steps also involved in getting Git running as code repository within Jenkins.

Here's a workflow for setting up Jenkins with these features.

Install Jenkins and plugins

First of all, if you haven't installed Jenkins the easiest way is to download the war archive from http://jenkins-ci.org/. This article is based on Jenkins version 1.532.1. You can install in in a server container like Tomcat or Jetty, but the easiest way to get started is to run it from the command line like 

java -jar jenkins.war

I created a small bash script which also changes the port since I have another server using the default 8080 port.

#!/bin/sh

nohup java -jar jenkins.war --httpPort=8081

So now you can access Jenkins via http://localhost:8081 or similar.

Now we must install some plugins which are not part of the core distribution. Go to the settings of Jenkins and find the Plugins section.

Here you should at least find the following plugs and install them


Creating Jenkins job

Create a new Jenkins job. My project handles its dependencies via Maven 3 which suits Jenkins very well. Choose the Maven 2/3 option.


In the next step, choose Git as SCM. If you have your Git repository on the same server as Jenkins you can simply add the file path to the repository. Otherwise you setup the security credentials here as well. Also, choose if you want to build master or some other branch.


We haven't talked about the pom.xml for the project yet, but it will be configured to use some Maven goals. So in the Maven goals section, add goals for test package site.

Under Build settings, check the boxes for Publish Checkstyle analysis resultsPublish FindBugs analysis results and Publish duplicate code analysis results.


In the Post-build Actions add a step for Cobertura reporting.


Maven will generate the Cobertura report to the Jenkins workspace under path /target/site/cobertura/coverage.xml so add this in the configuration of the action.


Now you should have a Jenkins job setup ready for building.


Before building we must make sure the pom.xml of the project has the correct plugins and reports configured.

Maven pom.xml configuration

After all the dependency specifications in the pom.xml add something similar to this. In this setup Cobertura is configured in the package phase and that's why we added that Maven goal above. If you hadn't added this in the pom file, you could have added separate Maven goals for Cobertura in Jenkins as well.

<build>
   <finalName>Unitconversion</finalName>
   <plugins>
      <plugin>
         <groupId>org.codehaus.mojo</groupId>
         <artifactId>findbugs-maven-plugin</artifactId>
         <version>${findbugs.version}</version>
      </plugin>
      <plugin>
         <groupId>org.codehaus.mojo</groupId>
         <artifactId>cobertura-maven-plugin</artifactId>
         <version>${cobertura.version}</version>
         <configuration>
            <formats>
               <format>xml</format>
            </formats>
         </configuration>
         <executions>
            <execution>
               <phase>package</phase>
               <goals>
                  <goal>cobertura</goal>
               </goals>
            </execution>
         </executions>
      </plugin>
   </plugins>
</build>
<reporting>
   <plugins>
      <plugin>
         <groupId>org.codehaus.mojo</groupId>
         <artifactId>findbugs-maven-plugin</artifactId>
         <version>${findbugs.version}</version>
      </plugin>
      <plugin>
         <groupId>org.apache.maven.plugins</groupId>
         <artifactId>maven-checkstyle-plugin</artifactId>
         <version>${checkstyle.version}</version>
      </plugin>
      <plugin>
         <groupId>org.apache.maven.plugins</groupId>
         <artifactId>maven-surefire-report-plugin</artifactId>
         <version>${surefire.reportplugin.version}</version>
      </plugin>
      <plugin>
         <groupId>org.codehaus.mojo</groupId>
         <artifactId>cobertura-maven-plugin</artifactId>
         <version>${cobertura.version}</version>
         <configuration>
            <formats>
               <format>xml</format>
            </formats>
         </configuration>
      </plugin>
   </plugins>
</reporting>
Run the job and everything should work out of the box. Do another build to start getting history graphs like below of the trend of failing tests, checkstyle warnings, issues found by Findbugs and te code coverage statistics from Cobertura.


Tuesday, 21 January 2014

Share code between Windows and Linux using git

Here's how I setup my git repository on my Linux HTPC which I can store my projects on from the Windows workstation. No extra daemons or servers running. Plain ssh.

First create a repository on the Linux machine.

johan@johanhtpc ~ $ mkdir gitrepos
johan@johanhtpc ~ $ cd gitrepos/
johan@johanhtpc ~ $ mkdir UnitConversion.git
johan@johanhtpc ~ $ cd UnitConversion.git/
johan@johanhtpc ~ $ git --bare init --shared=all

Now, from the Windows machine, I start up gitbash and go to the directory where I have the code I want to share. Then I add a new remote against my Linux machine and name the remote htpc.

Johan@ELLINGTONI5 /c/ws/UnitConversion
$ git init
Initialized empty Git repository in c:/ws/UnitConversion/.git/

Johan@ELLINGTONI5 /c/ws/UnitConversion (master)
$ git remote add htpc johan@johanhtpc:gitrepos/UnitConversion.git

I add everything in this directory to the local repository

Johan@ELLINGTONI5 /c/ws/UnitConversion (master)
$ git add --all

Johan@ELLINGTONI5 /c/ws/UnitConversion (master)
$ git commit

Now, let's push everything over the network to the Linux machine.

Johan@ELLINGTONI5 /c/ws/UnitConversion (master)
$ git push htpc master
johan@johanhtpc's password:
Counting objects: 729, done.
Delta compression using up to 4 threads.
Compressing objects: 100% (601/601), done.
Writing objects: 100% (728/728), 141.03 MiB | 8.35 MiB/s, done.
Total 728 (delta 118), reused 0 (delta 0)
To johan@johanhtpc:johanrepo.git
   869b12e..ab0f0b7  master -> master

Now, if I want to checkout the code on the Linux machine as a working copy, it's really simple

johan@johanhtpc ~/ws $ git clone ~/gitrepos/UnitConversion.git
Cloning into 'UnitConversion'...
done.

Now, push and pull from the local repositories against the common to work. Notice that from the Linux working repository the remote is named by default origin. So when pushing the command will be

johan@johanhtpc ~/ws/UnitConversion $ git push origin master


Saturday, 28 December 2013

Git GitHub Cheat Sheet

Some of the most frequent git commands I use, but also forget between the times I need them.

Setup a repository

git clone <repository>
Clone the specified repo to current location. Think CVS checkout.
To clone a GitHub repository, copy the link to the repo on the GitHub site.
git clone https://github.com/johannoren/WeatherStation.git

If you instead start by creating your project locally you initialize git by
mkdir MyProject
cd MyProject
git init

To add a file
touch foo
git add foo
git commit -m "First commit"

To connect your local repository to GitHub (or other remote repository) assuming we have created a MyProject project on GitHub we create a remote named origin.
git remote add origin https://github.com/johannoren/MyProject.git

To push our local commited file to the remote origin on the main branch master
git push origin master

To clone a repository on one of your other machines, do this over ssh
git clone ssh://johan@192.168.1.6:/home/johan/gitrepos/MyRepo.git

Git configuration

git config -e
Open the Git config file in the default editor

git config --global user.name 'Johan Noren'
git config --global user.email abc@gmail.com
Edit the author and email when making commits

git config --list
List all Git configuration options

If you add --global after these config commands, they will be applied to all repositories and not only the current repo.

Diffs, shows, blames, history and info

git diff
What has changed since your last commit? To diff only a file use
git diff -- <filename>

git status
List added files to the staging area, changed files and untracked files.

git log
Show the most recent commits. Comes with a collection of options:
--color           Color coded
--graph           Commit graph added to the left
--decorate   Add branch and tag names to commits
--stat             Show files changed, inserted, deleted
-p                       Show all diffs
--author="Johan Noren"  Commits by a certain author
--after="MMM DD YYYY" ex. ("Jun 20 2008") Filter commits by date
--before="MMM DD YYYY"
--merge        Filter out commits occuring in the current merge conflict.

git show <revision>
Show the diff of a commit specified by <revision>. Revision can be any SHA1 commit ID, branch name, or tag.

git blame <filename>
Show the author of each line in a file.

git ls-files
List all files version controlled

Add and delete files

git add <file> <file> ...
Add files to the git project

git add <directory>
Add all files in direcotry including all subdirectories

git add .
Add all created/modified files in current directory (not deleted)

git add -u  
Add to index only files deleted/modified and not those created

git add -A  
Do both operation at once, add to index all files

git add -p
Patch mode allows you to stage parts of a changed file, instead of the entire file. This allows you to make concise, well-crafted commits that make for an easier to read history.

git rm <file> <file>
Remove the files from the git project.

git rm $(git ls-files --deleted)
Remove all deleted files from the git project

Stage and commit

git add <file1> <file2> ...
git stage <file1> <file2> ...
Add changes in <file1>, <file2> ... to the staging area which will be included in the next commit

git add -p
git stage --patch
Walk through the current changes (hunks) and decide for each change which to add to the staging area.

git reset HEAD <file1> <file2> ...
Remove files from the next commit

git commit <file1> <file2> ... [-m <message>]
Commit <file1>, <file2> ... optionally using commit message <msg>

git commit -a
Commit all files changed since your last commit not including new (untracked) files.

Branches and merging

git branch
List all local branches

git branch -r
List all remote branches

git branch <branchname>
Create a new branch named <branchname>, referencing the same point in history as the current branch.

git branch <branch> <start-point>
Create a new branch named <branch>, referencing <start-point>, which may be specified using a branch name or a tag name and more.

git push <repo> <start-point>:refs/heads/<branch>
Create a new remote branch named <branch>, referencing <start-point> on the remote. Repo is the name of the remote.
Examples:
git push origin origin:refs/heads/branch-1
git push origin origin/branch-1:refs/heads/branch-2
git push origin branch-1 ## shortcut

git branch -d <branchname>
Delete branch <branchname>

git branch -r -d <remote-branch>
Delete a remote-tracking branch. Example
git branch -r -d branchname/master

git checkout <branchname>
Update the working directory to reflect the version referenced by <branchname> and make the current branch <branchname>

git checkout -b <branchname> <start-point>
Create a new branch <branchname> referencing <start-point>, and check it out.


git merge <branchname>
Merge branch <branchname> into the current branch.

Tags

git tag
List all available tags

There are two types of tags, lightweight and annotated. Less information is stored in lightweight tags so always use annotated '-a' if unsure.
git tag -a v1.0_20140102_2122 -m 'Tag information'

To push the tag to GitHub use
git push origin <tagname>
or if you have many tags or if you are lazy, push all tags
git push origin --tags

Handle remote repositories

git fetch <remote>
Update the remote-tracking branches for <remote> (defaults to "origin"). Does not initiate a merge into the current branch, see "git pull".

git pull
Fetch changes from the server, and merge them into the current branch.

git push
Update the server with the commits across all branches that are common between the local copy and the server. Local branches that were never pushed to the server are not shared.

git push origin <branch>
Update the server with your commits made to <branch> since your last push. This is always required for new branches that you wish to share. After the first explicit push, "git push" is sufficient.

git remote add <remote> <remote_url>
Add a remote repository to your git config.  Can then be fetched locally.
git remote add myworkteam git://github.com/somename/someproject.git
git fetch myworkteam

Revert local changes

Assuming you did not commit the file, or add it to the index, then:
git checkout filename

Assuming you added it to the index, but did not commit it, then:
git reset HEAD filename
git checkout filename

Assuming you did commit it, then:
git checkout origin/master filename

Assuming you want to blow away all commits from your branch (VERY DESTRUCTIVE):
git reset --hard origin/master

Thursday, 19 December 2013

Clone a GitHub project into Eclipse

I've been using the Git command line tools to setup my workspaces against GitHub and then importing projects into Eclipse going back and forth to the command line to diff, commit and push back to origin. In my current project I've discovered the Git Repository Explorer in Eclipse and how it makes many of the tasks much easier.

To clone an existing GitHub repository add the perspective Git Repository Explorer

Choose to clone a repository
Add details about the remote repository
The URI can be found on the GitHub page for the repository you wish to clone

Select the branch to check out and in the next view tick the "Import all existing projects after clone finishes"
Then you got your project in your workspace as expected


Now the usual Eclipse goodies har here for you, to diff local changes is much clearer than the command line diff utility for example

The synchronize option to see all changes in your local copy

Inspecting the history of the file is also presented in a more readable manner


Commit and push to origin (GitHub in this case) is a single operation if you wish